Tutorial part 1
Hello World Example
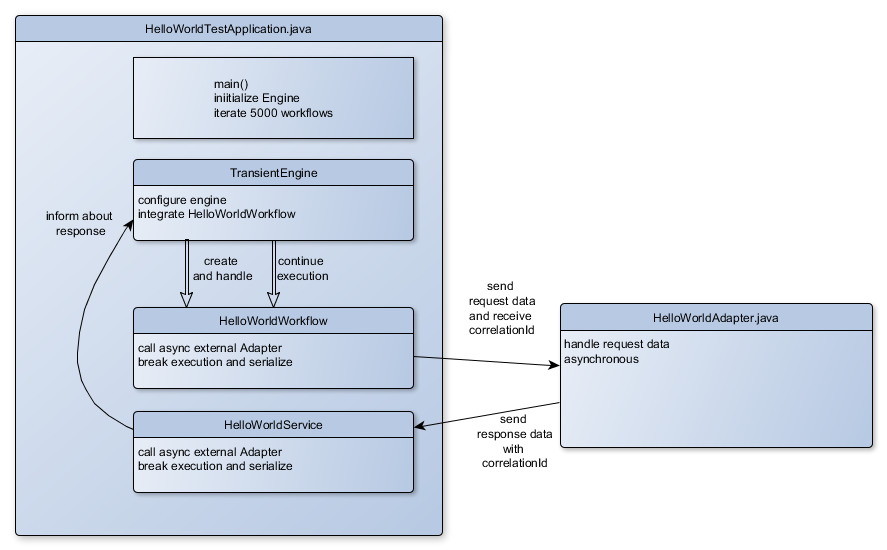
What you need to know:
- src/main/workflow/ contains source code for the workflow Java Files and is monitored for changes during execution.
- each workflow sends request data to a mocked “external” adapter and gets a ticket correlationID.
- the workflow execution stops and the java object is stored in memory.
- The adapter responses by calling HelloWorldService with the correlationId and the response
- HelloWorldService informs the copper engine.
- the corresponding workflow is resumed.
Step 1: copper provides “unlimited” threads
Copper can handle a lot of workflow threads.
Increase the number of workflow thread to 100000. (HelloWorldTestApplication.java (line: 28)
private static int NUMBER_OF_WORKFLOWS = 100000;
Run the application.
gradle --info runHello
Step 2: workflow code can be changed during execution
Open HelloWorldWorkFlow.java in Editor. Run the application with 100.000 workflows.
gradle --info runHello
During execution uncomment HelloWorldWorkFlow.java line: 38
logger.info(correlationId+ ": workflow part one: Hello World!");
After maximum 5 sec you will see the additional log entry in the console.
Step 3: workflow uses wait() to suspend execution
 @Override
    public void main() throws Interrupt {
        final String correlationId = HelloWorldAdapter.get().asyncSendHelloWorld(getData());
        logger.info(correlationId+ ": workflow    break: Hello World!");

        wait(WaitMode.ALL, 5 * 60 * 1000, correlationId); //timeout after 5 minutes.
        (...)
wait() can wait for one or multiple corellationIds and continue, if one or all IDs are handled. A timeout (in ms) can be specified for the maximum waiting time.
wait(WaitMode.FIRST, 5 * 60 * 1000, correlationId, correlationId2, correlationId3); //timeout after 5 minutes.
If HelloWorldService.sendResponse(String correlationId, boolean success, String answer) is called by the external system,
it informs the copper engine about the response and provides the response data.
    public void sendResponse(String correlationId, boolean success, String answer) {
        HelloWorldResponse payload = new HelloWorldResponse(success, answer);
        Response<HelloWorldResponse> response = new Response<HelloWorldResponse>(correlationId, payload, null);
        Acknowledge.DefaultAcknowledge ack = new Acknowledge.DefaultAcknowledge();
        engine.notify(response, ack);
        ack.waitForAcknowledge();
    }
The workflow continues, retrieves the response data and handles it.
        final Response<HelloWorldResponse> response = getAndRemoveResponse(correlationId);
        logger.info(correlationId + ": workflow continue: " + response.getResponse().getAnswer());
After completing the workflow the engine gets an acknowledge for the successful completion.
Step 4: How to create a new workflow
	@WorkflowDescription(alias = "HelloWorldWorkFlow", majorVersion = 1, minorVersion = 0, patchLevelVersion = 0)
	public class HelloWorldWorkFlow extends Workflow<HelloWorldRequest> {
	    @Override
	    public void main() throws Interrupt {
	    	(...)
	    }
	}
New workflows have the following requirements:
- the java source code of the workflow needs to be found by the copper engine in a specified source directory (e.g. “src/workflow/java”)
- included Java fields needs to be serializable.
- the workflow needs to extend org.copperengine.core.Workflow or org.copperengine.core.persistent.PersistentWorkflow depending on the used engine version.
- include workflow logic in
public void main() throws Interrupt {} - wait() stops the execution with correlationId and timeout
- copper starts continuation with correlationID and workflow can get response data with getAndRemoveResponse(correlationId)
The workflow needs to be created by the engine with a name reference (and optional version)
HelloWorldTestApplication.java
engine.run("HelloWorldWorkFlow", getNewData());
Step 5: WorkFlow with multiple versions
For long running Workflows it might be needed to have the same workflow in mutliple versions. We want to change the business logic for new workflow instances, but still running instances should still complete the workflow with the old business logik.
For this each workflow has @WorkflowDescription annotation with version attributes. Per default the engine uses for new Workflow instances the newest version.
- Open HelloWorldWorkFlowV2.java in the Java editor.
- gradle –info runHello
- In the editor set the majorversion = 2.
- HelloWorldWorkFlowV2.java will now be used for new workflow instances
	@WorkflowDescription(alias = "HelloWorldWorkFlow", majorVersion = 2, minorVersion = 0, patchLevelVersion = 0)
	public class HelloWorldWorkFlowV2 extends Workflow<HelloWorldRequest> {
	    @Override
	    public void main() throws Interrupt {
	    	(...)
	    }
	}
Step 6: Debug WorkFlow in IDE
If you start HelloWorldTestApplication in an IDE with Debug Mode, you can set breakpoints in the Workflow as usual.
Step 7: Configure the copper engine
The complete configuration of the copper engine is inside TransientEngineFactory.java:
The (transient) engine has many configurable components:
- DependencyInjector: manages dependencies inside the workflow java classes
- EarlyResponseContainer: how to handle async responses that comes early, before the corresponding wait() method in the workflow is called.
- EngineIdProvider: advanced feature for persistent engines
- IdFactory: provides unique correlation IDs
- PoolManager: handle Thread pools
- RuntimeStatisticsCollector: provides runtime statistics
- TicketPoolManager: provides overflow handling
- TimeoutManager: provides timeout handling: send timeout response
- WorkflowRepository: handles source code directory